# NAT2K15 Documentation

Welcome to the NAT2K15 Development script documentation! Before we begin, we'd like to introduce ourselves and give you some insight into our journey and objectives on this platform.

<figure><img src="/files/8lZqnrqYnZnX7P7vhY9h" alt=""><figcaption></figcaption></figure>

***

## About Us

Welcome to NAT2K15 Development, a dedicated hub for delivering top-notch scripts and tools tailored for the FiveM community. As one of the emerging names in the field, we pride ourselves on providing high-quality products that enhance the gaming experience for our community members.

Founded nearly three years ago, NAT2K15 Development began by creating Discord bots to serve our community, and more recently, we expanded into developing scripts specifically for FiveM. Our commitment is to offer a customized, seamless experience with every product we release. Whether you're looking for the best FiveM scripts or innovative Discord bots, NAT2K15 Development is here to meet your needs.

If you have any questions or concerns, please don't hesitate to open a ticket. We’re here to ensure you have the best possible experience with our products.

***

## Term of service&#x20;

{% embed url="<https://store.nat2k15.xyz/tos>" %}

***

## Support

### Who is eligible for support?

* Every NAT2K15 Development customer
* Every **confirmed** developer of a customer
  * *This means the product owner needs to confirm the developer as their own*

*\*We reserve the right to <mark style="color:red;">**DENY**</mark> support to any customer or non-customer who fails to adhere to our terms of service or does not treat our staff with respect. Please be mindful that our team is busy, and response times may vary. Typically, we aim to respond within 2-6 hours in the Discord server.*


# FiveM Framework


# Choose your hosting

In this section we will show you how to install the framework in steps.

***

{% embed url="<https://portal.silverhostingnetwork.com/aff.php?aff=19>" %}
Sponsored by Silver Hosting Network\
We don't just host servers we host dreams.
{% endembed %}


# 💻Windows Hosting

Installation steps regarding the Framework v2 can be shown below, however, these steps only work for the following hosting services: VPS & Local Hosting,


# 🛢️MySQL Installation (xampp)

Creating a local server environment on your Windows machine with XAMPP and setting up a database for FiveM  involves a few steps. This guide will show you how to do it in no time!

***

## *Installing XAMPP:*

#### Step 1: Download and Install XAMPP

1. **Visit the Official XAMPP Website**: Go to [Apache Friends](https://www.apachefriends.org/download.html) and download the XAMPP installer for Windows.&#x20;
2. **Run the Installer**: Launch the downloaded installer. You might need to approve the UAC prompt and disable any antivirus temporarily if it blocks the installation.
3. **Select Components**: During installation, ensure that **Apache**, **MySQL**, and **PHP** are selected. You can deselect other components unless you know you'll need them.
4. **Choose Installation Directory**: You can install XAMPP in the default directory (`C:\xampp`) or choose another location. Click Next and proceed with the installation.
5. **Complete Installation**: Follow the remaining prompts and finish the installation.

**Step 2: Start Apache and MySQL**

1. **Launch XAMPP Control Panel in Administrator**: After installation, open the XAMPP Control Panel. You can find it in the Start Menu or where you installed XAMPP.
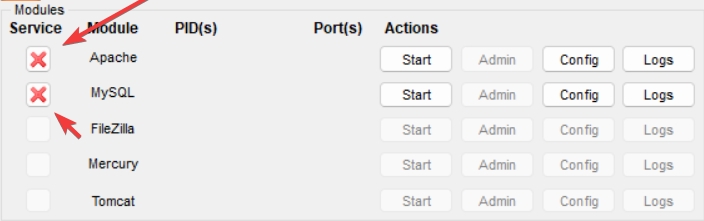
2. **Installing services:** When XAMPP opens up click the ❌ button on the left side of Apache and MySQL and install the services.

<figure><img src="https://i.imgur.com/3WElWOb.png" alt=""><figcaption></figcaption></figure>

3. **Start Apache and MySQL**: Click the 'Start' buttons next to Apache and MySQL. This will run your local server and database server.

**Step 3: Creating The Database**

1. **Open phpMyAdmin: Open phpMyAdmin using the `Admin` Button on Mysql trough xampp.**
2. **Creating a database:** Upon opening phpMyAdmin click new on the top left then type for database name `fivem` (all lowercase) then click create.

<figure><img src="/files/EP0P4plN9EURx1ysxcO5" alt=""><figcaption></figcaption></figure>

Congratulations, you now know how to create a fivem database. Move on to the next page to continue the installation.


# 🛢️MySQL Connection String

Creating your database is 1 thing, but connecting your database to your server is another, below are a few steps on how to connect your fivem server to your mysql database.

***

Creating your connection string:

1. **Visit the MySQL String Generator Website:** [Here](https://brouznouf.github.io/fivem-mysql-async/)
2. Click `Next` twice until you are on `3: Configure the FXServer`.

<figure><img src="/files/ydVZf1eoFG7Hfdl6AUNQ" alt=""><figcaption></figcaption></figure>

3. **After you are on the 3rd page, scroll down until you see this:**

<figure><img src="/files/BSh4JmiTfRUsVtQDSyGR" alt=""><figcaption></figcaption></figure>

4. **The following information will be required for your connection string to work:** (Some other things you can add will be: **acquireTimeout** and **connectTimeout** - These will make the string take longer before connecting / pushing an error.)

* User
* database
* host
* password

<figure><img src="https://i.imgur.com/I2hE9QE.png" alt=""><figcaption><p>Password only required if you created with a password</p></figcaption></figure>

5. **After filling out the info regarding your database and you should see a section called `FXServer Configuration`**
6. **Copy the line shown below from the website and paste it into your server.cfg and restart your server**

<figure><img src="/files/QPoCJdvJ8lsmtOfVKV0C" alt=""><figcaption></figcaption></figure>

## Ensuring oxmysql or mysql-async

Whether you use [oxmysql ](https://github.com/overextended/oxmysql)or [mysql-async](https://github.com/brouznouf/fivem-mysql-async) the way you ensure the it matters.

1. Put the following lines of code into your server.cfg below all the default resources required by FiveM.

```lua
set mysql_connection_string "host=localhost;user=root;database=fivem"
ensure mysql-async -- Only if using mysql-async
ensure oxmysql -- Only if using oxmysql
```

Congratulations, you connected your database to your FiveM Server!


# 👨‍💻Installing Framework

***

#### Step 1: Downloading the Framework

1. Head over to our [website](https://store.nat2k15.xyz/store) and click on your profile on the top right of the page.

<figure><img src="/files/GBpdqFKciMXF4knk9i0a" alt=""><figcaption></figcaption></figure>

2. Click download on the resource: **FiveM Framework V2**

<figure><img src="/files/WIwjrzzaF1wpzbTp5Nu8" alt=""><figcaption></figcaption></figure>

3. Open the zipped file using either [WinRar](https://www.win-rar.com/postdownload.html?\&L=0) or [7-Zip](https://www.7-zip.org)
4. Create a folder in your `\resources` directory called `[Framework]`
5. Drag `framework` and `[Framework-Addons]` into the folder you made in step 4.


# 🐧Linux Hosting


# 🛢️MySQL Installation

Creating a local server environment on your Windows machine with XAMPP and setting up a database for FiveM  involves a few steps. This guide will show you how to do it in no time!

***

#### Step 1: Update and Upgrade your linux machine

```bash
sudo update
sudo upgrade -y
```

This will take a little bit so give it sometime keep your SSH connection open while running this process.

#### Step 2: Installing mysql-server

```bash
sudo apt install mysql-server -y
```

#### Step 3: Connecting to mysql

Run the following command to get into the MySQL server in SSH&#x20;

```bash
sudo mysql
```

#### Step 4: Assigning a password to the root account

Change `password` with the password you want the root account for this demo we used: `COOL`You can generate a secure password by visiting this website [CLICK ME](https://www.lastpass.com/features/password-generator#generatorTool)

```sql
ALTER USER 'root'@'localhost' IDENTIFIED WITH mysql_native_password BY 'COOL';
```

```sql
FLUSH PRIVILEGES;
```

```bash
EXIT; 
```

#### Step 5: Logging back into your MySQL server after changing the password

```
sudo mysql -u root -p
```

Now enter your new password in this case it would be `COOL`

#### Step 6: Creating the FiveM database

```sql
CREATE DATABASE fivem;
```

#### Step 7: Exit

```sql
EXIT;
```

😊 Congratulations, you created your first database in a linux server.&#x20;


# 🛢️MySQL Connection String

Creating your database is 1 thing, but connecting your database to your server is another, below are a few steps on how to connect your fivem server to your mysql database.

***

Creating your connection string:

1. **Visit the MySQL String Generator Website:** [Here](https://brouznouf.github.io/fivem-mysql-async/)
2. Click `Next` twice until you are on `3: Configure the FXServer`.

<figure><img src="/files/ydVZf1eoFG7Hfdl6AUNQ" alt=""><figcaption></figcaption></figure>

3. **After you are on the 3rd page, scroll down until you see this:**

<figure><img src="/files/BSh4JmiTfRUsVtQDSyGR" alt=""><figcaption></figcaption></figure>

4. **The following information will be required for your connection string to work:** (Some other things you can add will be: **acquireTimeout** and **connectTimeout** - These will make the string take longer before connecting / pushing an error.)

* User
* database
* host
* password

<figure><img src="https://i.imgur.com/I2hE9QE.png" alt=""><figcaption><p>Password only required if you created with a password</p></figcaption></figure>

5. **After filling out the info regarding your database and you should see a section called `FXServer Configuration`**
6. **Copy the line shown below from the website and paste it into your server.cfg and restart your server**
<figure><img src="/files/QPoCJdvJ8lsmtOfVKV0C" alt=""><figcaption></figcaption></figure>

## Ensuring oxmysql or mysql-async

Whether you use [oxmysql ](https://github.com/overextended/oxmysql)or [mysql-async](https://github.com/brouznouf/fivem-mysql-async) the way you ensure the it matters.

1. Put the following lines of code into your server.cfg below all the default resources required by FiveM.

```lua
set mysql_connection_string "host=localhost;user=root;database=fivem"
ensure mysql-async -- Only if using mysql-async
ensure oxmysql -- Only if using oxmysql
```

Congratulations, you connected your database to your FiveM Server!


# 👨‍💻Installing Framework

***

#### Step 1: Downloading the Framework

1. Head over to our [website](https://store.nat2k15.xyz/store) and click on your profile on the top right of the page.

<figure><img src="/files/GBpdqFKciMXF4knk9i0a" alt=""><figcaption></figcaption></figure>

2. Click download on the resource: **FiveM Framework V2**

<figure><img src="/files/WIwjrzzaF1wpzbTp5Nu8" alt=""><figcaption></figcaption></figure>

3. Open the zipped file using either [WinRar](https://www.win-rar.com/postdownload.html?\&L=0) or [7-Zip](https://www.7-zip.org)
4. Create a folder in your `\resources` directory called `[Framework]`
5. Drag `framework` and `[Framework-Addons]` into the folder you made in step 4.


# 🎮Panel Hosting

Coming soon!


# Framework Addons

In this page you will all the paid and free framework addons that can be incorporated with our framework. If you want your script listed on this docs contact us!


# FiveM Scoreboard

Slick FiveM scoreboard designed to work with our framework. level up your server with a clean design.

## Setup

1. Extract the zip folder into your resource folder and name the script `framework-scoreboard`&#x20;
2. Edit the config to your liking a breakdown of the config will be below.&#x20;
3. Start the resource after the framework&#x20;
4. Load in and test :smile:

```
ensure framework
ensure framework-scoreboard
```

## Configuration Documentation

```lua
config = {}
config.delay = 1500 -- Delay in milliseconds between each check
config.key = 27 -- Key to open the menu

config.uiSettings = {
    serverName = "NAT RP - {playercount}", -- Possible varibles {playercount}
    banner = {
        enabled = true,
        url = "https://i.ibb.co/hFRM77G/faxsstore.png"
    },
    ping = {
        enabled = false
    }
}
```

### Global Configuration

* **`config.delay`**:\
  Sets the delay in milliseconds between each check.
  * **Type**: Integer
  * **Default**: `1500`
* **`config.key`**:\
  Specifies the key used to open the menu.
  * **Type**: Integer
  * **Default**: `27` (This usually corresponds to the 'ESC' key)

### UI Settings (`config.uiSettings`)

The `config.uiSettings` table contains settings related to the user interface.

#### Server Name (`serverName`)

* **`serverName`**:\
  The name of the server displayed in the UI.
  * **Type**: String
  * **Default**: `"NAT RP - {playercount}"`
  * **Description**: You can use the `{playercount}` variable to dynamically display the current number of players.

#### Banner (`banner`)

* **`banner.enabled`**:\
  Enables or disables the display of a banner in the UI.
  * **Type**: Boolean
  * **Default**: `true`
* **`banner.url`**:\
  The URL of the image used as the banner.
  * **Type**: String
  * **Default**: `"https://i.ibb.co/hFRM77G/faxsstore.png"`

#### Ping (`ping`)

* **`ping.enabled`**:\
  Enables or disables the display of the ping information in the UI.
  * **Type**: Boolean
  * **Default**: `false`

### Known Issues

if you have changed the default name of the framework to lets say rp-framework. You will need to modify the server.lua. <br>

1. Go into `Framework-scoreboard/server/server.lua`&#x20;
2. Edit the framework to match your resource name. Only edit what's in the "framework"

<figure><img src="/files/fsdIxaaoLuooSVqoGJiR" alt=""><figcaption><p>Framework-scoreboard/server/server.lua</p></figcaption></figure>


# Framework 911 (paid)

This document provides support information for integrating and using the FiveM resource with the our framework. Ensure the framework is installed and properly configured before proceeding

#### Step 1: Install the NAT2K15 Framework

If you haven't already, follow the instructions provided by the NAT2K15 framework documentation to install and configure it on your server.

#### Step 2: Disable the 911 Command

Edit the framework configuration file to disable the 911 command. This step is crucial to prevent conflicts with this resource. Locate the configuration file, typically found in the `config` folder of the framework, and set the `Command_911`parameter to `false`.

<figure><img src="https://i.imgur.com/Rwldx6U.png" alt=""><figcaption></figcaption></figure>

1. Download the resource files.
2. Place the resource folder in your server's `resources` directory.
3. Ensure the folder name remains unchanged for proper integration.

#### Step 3: Update Server Configuration

Open your server configuration file (`server.cfg`) and add the following line to ensure the resource is started after the Nat2k15 framework:

```lua
start framework #NAT2K15 Framework
start framework-911
```

Replace `framework-911` with the actual name of the resource folder. The resource must start with letters we recommend to call the resource `framework-911`

{% embed url="<https://store.nat2k15.xyz/store/framework-911>" %}


# NPWD X Framework

We have made the New-Phone-Who-Dis (NPWD) compatible with our Frameworks.

Below you can find all of NPWD Links

{% embed url="<https://projecterror.dev/>" %}

{% embed url="<https://discord.com/invite/uy5N7jT5aJ>" %}

{% embed url="<https://github.com/project-error/npwd>" %}


# Editing NPWD Config

Assuming you have correctly installed NPWD head over to the config and edit the following values below. If you are stuck on installation. We would first recommended contacting the creators

1. **First Step Editing The Config**

Open your npwd resource and open `config.json` in your default text editor. We recommend using Visual Studio Code.

2. Editing The Config.

Set the following values to way we have it in the screenshot.

<figure><img src="https://i.imgur.com/LthBfR9.png" alt=""><figcaption></figcaption></figure>


# Installing npwd-framework

To ensure successful integration of your product with the NPWD framework, please follow these detailed steps carefully:

1. **Configure the NPWD-Framework:**
   * Navigate to the `npwd-framework` configuration settings.
   * Verify that the framework's name matches the exact folder name of your resource. By default, this is set to `framework`.
2. **Database Integration:**
   * Import the `patch.sql` file into your SQL server. This step is crucial to ensure that the integration functions correctly.
3. **Server Configuration:**
   * When editing the `server.cfg` file, it is imperative to adhere to the specific starting order detailed below. This order ensures that the framework operates efficiently, with `npwd` being initiated after its prerequisites:
     * `ensure screenshot-basic`
     * `ensure pma-voice`
     * `ensure npwd`
     * `ensure framework`
     * `ensure npwd-framework`

By following these steps, you'll facilitate a smooth integration process, allowing our product to work seamlessly with the NPWD technology.


# Change Logs

in this page you will find all the change logs for the Framework

<details>

<summary>Change Log 2.2.2 Auto Editor and more</summary>

## Changelog

#### Fixes

* Fixed some people not seeing the character UI when loading in. (`client/client.lua`)
* Fixed the `/loadout` command not working.
* Fixed the config not saving via admin panel (`html/js/script.js`).
* Fixed the shot spotter not working (`server/server.lua`).
* Fixed `/me` not displaying when in a vehicle.
* Fixed the issue with people falling through the map when spawning.
* Fixed disabling `/do` not working.

#### Improvements

* Made it so editing the config through the admin panel once saved will automatically change the variables without needing to restart the server.
* Changed image hosting to [ImgBB](https://imgbb.com/) due to issues with Imgur.
* Increased the character limit design.
* The config editor now works faster and automatically; no need to restart the server/resource anymore.
* Removed the blue border from every button and input.
* Added a small fade-in effect when using `/fw` or `/framework`.
* Improved console logging when the framework is started.
* Changed how the `version_checker` is used.

#### Additions

* Added a timestamp in the Discord logging.
* Added the user ID when using the OOC command.
* Added a config option for admins to have access to all departments.

</details>

<details>

<summary>Change Log 2.1.2 Beta Fixes</summary>

Thank you everyone for finding the bugs and reporting them after a deep dive of looking at the errors I was able to fix the two major ones. If you are still having issues make sure you replace all the files including the config.

#### Fixes

* fixed the hide is not defined (script.js)
* fixed the adminchat not working (commands.lua)
* fixed 911 commands typo (server folder, client folder)

</details>

<details>

<summary>Change Log 2.1 Much Needed Update</summary>

Yes after hundreds of requests we have added the blip system back. View below what else has been added. A lot of issues not listed in here have been fixed including exploits found my clients. Keep in mind this is in beta until I 100% am sure that not issues are found.

#### Add/Remove

* Added Blip System
* Added a age for Sonoran cad when creating a new character
* Added syntax highlighting for the config editor in the admin panel
* Added an option to change the play as button
* Added a setting to move the hud (client side)
* Added a message for calladmin /calladmin (optional)
* Added some database stuff for exporting (auto)
* Remove lua error checking for the config in the admin panel

#### Fixes/Changes

* Cloud spawning
* hud not moving when changing the config
* Commands causing the chat to freeze
* /telp command not working
* door lock
* default images and custom images
* Cursor not displaying when having a loadingscreen
* /calladmin sending duplicated
* loc = nil error
* Framework settings features
* Sonoran cad API issues
* All Commands have been tested and fixed, aswell as logs to discord
* made the auto import SQL much faster and better.

</details>

<details>

<summary>Change Log 2.0 BETA</summary>

### Added

* Added a mute system
* Added a loading bar
* Added an option to switch the position of your framework
* Added a new logging system
* Added a config to disable the last location
* Added the ability for admins to lock/unlock doors.
* Added a more UI friendly/design for some of the main UI buttons
* Added a config option to remove "Do not Teleport"
* Added the option for the whitelist system to use ACE perms
* Added a custom background image in the client settings
* Added a scrollbar if the user's characters hit over 12.
* Added the option to add more than just 25 characters. (It is up to you now there is no max)
* Added text when reaching the maximum number of characters
* Added back some icons to display on the buttons
* Added the option to add components in the loadout system
* Added back the highly requested shot spotter.
* Added the option to add postal to the shot spotter
* Added a new design for all our huds. We now use HTML
* Added a street label Hud
* Added a blip system for the panic
* Added the option to have your department's alphabetic orders within the config.
* Redesigned the characters section in the admin panel to be more user appealing
* Added the option to search a user's characters by discord
* Added a department name in the info section within the admin panel
* Added a little fade with all the buttons to create a better experience
* Added a different colour into our framework.
* Added the effect of the colour changing when hovering over something
* Added a little bit of space in the admin panel so it doesn't seem so lacerated

### Changes

* Changed the required files to use a CDN in stade of a local file.
* Changed some functions around
* Changed some of the colours within the Framework UI
* Changed the text of the you are playing as.
* Changed the panic and Shot spotter text
* Changed the website button to stay within the Framework panel
* Changed the discord button to stay within the Framework panel
* Changed how the door lock works to improve permofermnce
* Changed the door lock to use HTML notification
* Changed the Framework.RegisterCommand to work with our new mute system
* Changed quite a bit of the config (Read below for more info)
* Changed how the discord-rich presence to allow better configurable options
* Changed how some of our debug systems work
* Changed our Auto Upload SQL. **DO NOT DELETE sql.sql** (unless you know what you're doing)

### Fixes

* Fixed the connection issue a lot of people were having
* Fixed some sync issues with the door lock
* Fixed an issue with the door lock when respawning
* Fixed the issue with your game crashing when switching characters
* Fixed the discord button not working
* Fixed the website button not working
* Fixed the info button not displaying icons in the Framework UI
* Fixed an issue when the background duplicated when its too small
* Fixed most known bugs as well as found bugs when working on the framework
* Fixed the auto SQL system

## Notable Changes

#### Framework Performance

Some parts of the framework have been written to improve performance and after successfully fixing and changing a lot of things we are proud to say: Our Framework should sit at 2-4% ms when in the Framework UI, and stay at 6-8& when in the game. The framework has dropped a significant amount (it used to sit at 14-17%)

#### HTML Huds

As mentioned in our additions above we have migrated from default GTA text into HTML huds. We have asked a lot of clients and most people would prefer it that way.

#### Shot Spotter

YES. Shot spotter has been added back and it is better than ever. When our team tested the system we found it to be much more accurate and better performance.

#### Removed our ban system

We have decided to remove our ban system from the admin panel. After reviewing and listening to our customers we have noticed that the ban system doesn't get used much and causing some issues.

#### Switched from MySQL to oxmysql

After being asked numerous times to switch we have finally done it. if you currently use MySQL-Async here is a guide on how to install oxmysql <https://overextended.dev/oxmysql#download-the-latest-release>

#### Config Changes

We have changed how our config is set up. We changed how departments get created within the config. We have also made the option to allow everyone access much easier. Ensure to redo all the config because a lot has changed.

#### Door lock

After so many users have told us how much they like the door lock and how buggy it is sometimes. We have decided to rework parts of the code to make it much more user-friendly as well as do some needed optimization.

#### File Structure

We have changed how our file structure works. **Ensure you replace all the files and start editing your config from scratch** Before you open a ticket ensure you changed your entire config.

</details>

{% embed url="<https://store.nat2k15.xyz/store/framework-v2>" %}


# Developers Usage

In this page you will find all of current exports to integrate your scripts with our Framework.


# Client Side Exports

This docs is fairly new does not have all of the export we provide please be patient while we slowly work on this.

At the top of your client file. You will need to call the Framework's exports. This step is very crucial for all the exports to work properly.&#x20;

```lua
Framework = exports["framework"]:getClientFunctions()    
```

The "framework" will be the folder name the FiveM owner has in its resource. We recommend making this option configurable as not all users will have the default folder called framework.

<details>

<summary>Framework.isPlayerLoadedIn()</summary>

This will check if the player is fully loaded in to a character. It will return either a false or true here is an example.

```lua
Citizen.CreateThread(function()
    while true do 
        Citizen.Wait(500)
        if Framework.isPlayerLoadedIn() then
            print("Player is loaded in")
        else 
            print("Player is not loaded in")
        end
    end
end)
```

</details>

<details>

<summary>Framework.getPlayer(Framework.serverId)</summary>

In the client side you can only request the clients data. We have disabled the option to allow you to request any users data as it should all be done on the server side. To simply request the data do&#x20;

```lua
local player = Framework.getPlayer(Framework.serverId) 
print(json.encode(player)) -- this will print all of the users data
```

Here is an example of it working in a command

```lua
RegisterCommand("whatsmyname", function(source, args, message)
    local player = Framework.getPlayer(Framework.serverId)
    if(player) then
        TriggerEvent('chatMessage', "Your name is " .. player.char_name)
    else 
        TriggerEvent('chatMessage', "you are not loaded in via the framework")
    end
end)
```

</details>

<details>

<summary>Framework.getCurrentAop()</summary>

Will return the current AOP you have in the server. If the AOP is disabled in the framework it will return a nil value.

{% code title="Command example" %}

```lua
RegisterCommand("getcurrentaop", function(source, args, message) then
    local aop = Framework.getAop()
    if(aop) then    
        print("The current AOP is " .. aop)
    else 
        print("AOP has been disabled in the framework")
    end
end)
```

{% endcode %}

</details>

<details>

<summary>Framework.ShowInfo()</summary>

If you want to show text on the bottom left of the screen above the hud you can now simply do that with this export

```lua
RegisterCommand('showinfo', function(source, args, message) 
    Framework.ShowInfo("This is a test message")
end)
```

<img src="https://i.imgur.com/zpppdMh.png" alt="" data-size="original">

</details>

<details>

<summary>Framework.DisplayHelpText()</summary>

This export will display the message on the top left of your screen.&#x20;

```lua
RegisterCommand('showhelp', function(source, args, message) 
    Framework.DisplayHelpText("I need help")
end)
```

<img src="https://i.imgur.com/xLP16Im.png" alt="" data-size="original">

</details>

<details>

<summary>Framework.setHealth()</summary>

Very simple export that will set the players health. It will set the clients health to the amount provided.

```
Framework.setHealth(100)
```

</details>

<details>

<summary>Framework.setArmor()</summary>

Very simple export that will set the players armor. It will set the clients armor to the amount provided.

```
Framework.setArmor(100)
```

</details>


# Server Side Exports

Working on this docs! \[NOT FINISHED]

At the top of your server file. You will need to call the Framework's exports. This step is very crucial for all the exports to work properly.&#x20;

```lua
Framework = exports["framework"]:getServerFunctions()    
```

The "framework" will be the folder name the FiveM owner has in its resource. We recommend making this option configurable as not all users will have the default folder called framework.

<details>

<summary>Framework.getPlayers()</summary>

Using this export you will be able to get all the active players with all their character info and  print it. here is an exmaple

```lua
for _, player in pairs(Framework.getPlayers()) do 
    print(json.encode(player))
end
```

</details>

<details>

<summary>Framework.getPlayer()</summary>

Using this export you can get any  player as long as they are in the server and logged in.

```lua
RegisterCommand("dob", function(source, args, message)
    local player = Framework.getPlayer(source)
    if(player) then    
        TriggerClientEvent('chatMessage', player.src, player.dob)
    else 
        TriggerClientEvent('chatMessage', source, "You are on in the framework")
    end
end)
```

</details>

<details>

<summary>Framerwork.getDiscord()</summary>

There are two ways you can get someones discord. If they are logged in the framework. Use the Framework.getPlayer() otherwise Framework.getDiscord(). Here is an example

```lua
RegisterCommand('discord', function(source, args, message) 
    local player = Framework.getPlayer(source)
    -- If the player isn't online in the framework it will use the native way.
    if(player) then    
        TriggerClientEvent('chatMessage', player.src, player.discord)
    else
        local discord = Framework.getDiscord(source)
        if(discord) then
            TriggerClientEvent('chatMessage', source, discord)
        else     
            TriggerClientEvet('chatMessage', source, "Your discord isnt linked")
        end
    end 
end)
```

</details>

<details>

<summary>Framework.getSteam()</summary>

There are two ways you can get someones discord. If they are logged in the framework. Use the Framework.getPlayer() otherwise Framework.getSteam(). Here is an example:&#x20;

```lua
RegisterCommand('steam', function(source, args, message) 
    local player = Framework.getPlayer(source)
    -- If the player isn't online in the framework it will use the native way.
    if(player) then    
        TriggerClientEvent('chatMessage', player.src, player.steam)
    else
        local steam = Framework.getSteam(source)
        if(steam) then
            TriggerClientEvent('chatMessage', source, steam )
        end
    end 
end)
```

</details>

<details>

<summary>Framework.checkAdmin()</summary>

To check if a user is an admin is very simple. This will also check if they are logged into the framework. here is an exmaple

```lua
RegisterCommand('checkadmin', function(source, message, args) 
    if(Framework.checkAdmin(source) then    
        TriggerClientEvent('chatMessage', source, "you are an admin your cool")
    else 
        TriggerClientEvent('chatMessage', source, "You are not an admin")
    end
end)
```

</details>

<details>

<summary>Framework.extractIdentifier()</summary>

Very usful function to extract all a players identifiers. Below a simple way to display someones identifier. Please note this also grabs ips as well.

```lua
RegisterCommand("extract", function(source, args, message)
    local everything = Framework.extractIdentifier(source)
    print(json.encode(everything); -- display everything
    print(everything.discord); -- display users discord

end)
```

</details>


# Frequent Issues

When working with our frameworks, you may encounter some challenges. Here are some common issues and how to resolve them. If your issue is not in here open a ticket and we will assist you.

***

<details>

<summary><em>Cursor Not Displaying</em></summary>

If you are experiencing an issue where the cursor does not appear on your server, it may be due to the use of a function called `ShutdownLoadingScreenNui();` in a loading screen. This function removes the cursor from the user interface framework. Follow the steps below to resolve the issue:

1. **Navigate to Your Loading Script Folder**: Locate your loading script folder and find the client script file. The file is usually named `client.lua`, but it may have a different name.
2. **Open the Client Script**: Open the client script file in a text editor. We recommend using Visual Studio Code, but any text editor will work.
3. **Locate the `ShutdownLoadingScreenNui()` Function**: Search for the function `ShutdownLoadingScreenNui()` in the client script.
4. **Comment Out the Function**: Once you have located the function, comment it out by adding two dashes (`--`) before the function name. This will disable the function and prevent it from removing the cursor.

   ```lua
   -- ShutdownLoadingScreenNui();
   ```
5. **Save the Changes**: After commenting out the function, save the changes to the client script file.
6. **Restart Your Server**: Restart your server for the changes to take effect.

After completing these steps, the cursor should now display properly on your server. If you continue to experience issues, double-check the changes and ensure the server has been restarted properly.

</details>

<details>

<summary><em>Discord Rich Presence</em></summary>

### Configuration

Below is the configuration breakdown and instructions on how to set up the Rich Presence feature.

#### Config Options

```lua
Config.richPresence = {
    enabled = true,  -- Enable or disable the rich presence feature
    clientid = 801534049944207381, -- Your Discord bot application ID
    
    displayPlayingAs = "Currently playing as %s [%s]",
    -- This string defines how player information is displayed
    -- The first %s represents the player's name, the second %s represents their department
    -- Set to false to disable

    icons = {
        small = {
            text = "discord.gg/RquDVTfDwu",
            icon = "https://i.imgur.com/ZsuQUE3.png",  -- URL to the small icon
        },
        big = {
            text = "NAT2K15 RP",
            icon = "https://i.imgur.com/ZsuQUE3.png",  -- URL to the big icon
        }
    },

    discordButtons = {
        enabled = true,  -- Enable or disable Discord buttons
        button1 = {
            label = "Discord",  -- Button label
            url = "https://discord.gg/RquDVTfDwu"  -- Button link
        },
        button2 = {
            enabled = true,
            label = "Connect",  -- Button label
            url = "fivem://connect/IP:30120"  -- FiveM direct connect URL
        }
    }
}
```

### Step-by-Step Setup

#### 1. Setting Up Discord Application

1. Go to [Discord Developer Portal](https://discord.com/developers/applications).
2. Click **New Application** and give it a name.
3. Copy the `Application ID` and paste it into the `clientid` field in the config.

#### 2. Customizing Rich Presence

* **Player Display Format:**
  * Modify the `displayPlayingAs` field to change how player information appears.
  * Example:

    ```lua
    displayPlayingAs = "Active: %s | Role: %s"
    ```
* **Icons:**
  * Change the small and big icon URLs by uploading your own image to [Imgur](https://imgur.com/) or any direct image host.

#### 3. Configuring Discord Buttons

* Ensure `discordButtons.enabled` is set to `true` to activate buttons.
* Modify the labels and URLs to fit your server's needs.
* Example of button configuration:

  ```lua
  button1 = {
      label = "Join Discord",
      url = "https://discord.gg/YOURSERVER"
  }
  ```

</details>


# Personal Vehicle V2


# Discord Bot Token

Below there will be a guide on creating a discord bot token and inviting it to your discord.

#### 1. Access the Discord Developer Portal

Start by visiting the [Discord Developer Portal](https://discord.dev/developers/applications/). This portal is where you manage all your applications and bots.

* If you already have a bot, simply select it from the list.
* If not, click the “New Application” button to create one.

<figure><img src="/files/EMH413d6gCXLoF7Mv41z" alt=""><figcaption></figcaption></figure>

#### 2. Name Your Bot

Next, you’ll need to name your bot.

<figure><img src="/files/1Hw3ciOuDJXdKtqTYvWb" alt=""><figcaption></figcaption></figure>

#### 3. Configure Bot Settings

After naming your bot, navigate to the **Bot** tab.

* Click on **Add Bot** if your bot isn't already created.
* Once the bot is created, enable all necessary intents by toggling the options in the **Privileged Gateway Intents** section.

<figure><img src="/files/poKuT33mR8g8jxo6Wq4K" alt=""><figcaption></figcaption></figure>

#### 4. Invite the Bot to Your Discord Server

To invite the bot to your Discord server:

1. Go to the **OAuth2** tab.
2. Under **OAuth2 URL Generator**, select the following scopes:
   * `bot`
   * `applications.commands`
3. Scroll down to **OAuth2 URL Generator** and copy the generated URL.
4. Paste this URL into your browser, select your server, and authorize the bot.

<figure><img src="/files/d62Tu5MeAUkWn91TaYCl" alt=""><figcaption></figcaption></figure>

#### 5. Retrieve and Configure Your Bot Token

Finally, you’ll need to obtain your bot's token:

1. Navigate to the **Bot** tab.
2. Click **Reset Token** to generate a new token.
3. Copy the token and paste it into your `config.json` file where it says `"token"`.

<figure><img src="/files/V5utnaVZN1Jdg6kNGfUK" alt=""><figcaption></figcaption></figure>

<figure><img src="https://i.imgur.com/Lms5Iud.png" alt=""><figcaption></figcaption></figure>

&#x20;                                                   You have successfully completed the bot setup.


# Installing Dependency

The personal vehicle system relies on two dependencies: **menuv** and **oxmysql**. For **oxmysql** to function properly, a database is required. Please refer to the instructions below for detailed steps on how to install and configure the database.

## Oxmysql (Windows Version)

***

<details>

<summary>Installing SQL server</summary>

## *Installing XAMPP:*

#### Step 1: Download and Install XAMPP

1. **Visit the Official XAMPP Website**: Go to [Apache Friends](https://www.apachefriends.org/download.html) and download the XAMPP installer for Windows.&#x20;
2. **Run the Installer**: Launch the downloaded installer. You might need to approve the UAC prompt and disable any antivirus temporarily if it blocks the installation.
3. **Select Components**: During installation, ensure that **Apache**, **MySQL**, and **PHP** are selected. You can deselect other components unless you know you'll need them.
4. **Choose Installation Directory**: You can install XAMPP in the default directory (`C:\xampp`) or choose another location. Click Next and proceed with the installation.
5. **Complete Installation**: Follow the remaining prompts and finish the installation.

**Step 2: Start Apache and MySQL**

1. **Launch XAMPP Control Panel in Administrator**: After installation, open the XAMPP Control Panel. You can find it in the Start Menu or where you installed XAMPP.
2. **Installing services:** When XAMPP opens up click the ❌ button on the left side of Apache and MySQL and install the services.

<img src="https://i.imgur.com/3WElWOb.png" alt="" data-size="original">

3. **Start Apache and MySQL**: Click the 'Start' buttons next to Apache and MySQL. This will run your local server and database server.

**Step 3: Creating The Database**

1. **Open phpMyAdmin: Open phpMyAdmin using the `Admin` Button on Apache.**

<img src="/files/nGLfvW0o0nF7AJII7bPj" alt="" data-size="original">

2. **Creating a database:** Upon opening phpMyAdmin click new on the top left then type for database name `fivem` (all lowercase) then click create.

<img src="/files/EP0P4plN9EURx1ysxcO5" alt="" data-size="original">

Congratulations, you now know how to create a fivem database. Move on to the next page to continue the installation.

</details>

<details>

<summary>Creating an SQL string</summary>

Creating your connection string:

1. **Visit the MySQL String Generator Website:** [Here](https://brouznouf.github.io/fivem-mysql-async/)
2. Click `Next` twice until you are on `3: Configure the FXServer`.

<img src="/files/ydVZf1eoFG7Hfdl6AUNQ" alt="" data-size="original">

3. **After you are on the 3rd page, scroll down until you see this:**

<img src="/files/BSh4JmiTfRUsVtQDSyGR" alt="" data-size="original">

4. **The following information will be required for your connection string to work:** (Some other things you can add will be: **acquireTimeout** and **connectTimeout** - These will make the string take longer before connecting / pushing an error.)

* User
* database
* host
* password

<img src="https://i.imgur.com/I2hE9QE.png" alt="Password only required if you created with a password" data-size="original">

5. **After filling out the info regarding your database and you should see a section called `FXServer Configuration`**
6. **Copy the line shown below from the website and paste it into your server.cfg and restart your server**

<img src="/files/QPoCJdvJ8lsmtOfVKV0C" alt="" data-size="original">

## Ensuring oxmysql or mysql-async

Whether you use [oxmysql ](https://github.com/overextended/oxmysql)or [mysql-async](https://github.com/brouznouf/fivem-mysql-async) the way you ensure the it matters.

1. Put the following lines of code into your server.cfg below all the default resources required by FiveM.
2. **When downloading the files from github always select the releases version on the right side.**

<img src="/files/0yNXJNIG3wtFu9clxLB6" alt="" data-size="original">

```lua
set mysql_connection_string "host=localhost;user=root;database=fivem"
ensure oxmysql -- Only if using oxmysql
```

Congratulations, you connected your database to your FiveM Server!

</details>

## Menuv

***

Please download and install the required files from [this release link](https://github.com/ThymonA/menuv/releases). Once installed, make sure to start the resource before initializing the vehicle personal system to ensure everything functions correctly. This step is crucial for the proper integration of the menu with your setup.


# Editing the Config

There are two main configs you need to edit the rest are all commands trough discord

## vehicle-whitelist/config.lua

***

<figure><img src="/files/PLV07TxhtFbdo3KsZXJN" alt=""><figcaption></figcaption></figure>

**1. Basic Configuration**

* **`config.deleteOldVehicles = true`**
  * **Description**: This setting determines whether old vehicles should be automatically deleted when certain conditions are met.
  * **Default Value**: `true`
  * **Usage**: Set this to `true` to enable automatic deletion of old vehicles, or `false` to keep them.

**2. Text Configuration**

Customize the messages displayed to users in various scenarios by modifying the `config.text` table.

* **`deleteMessage`**
  * **Description**: Message displayed when a player tries to access a vehicle they do not have permission for.
  * **Default Value**: `"You do not have access to this personal vehicle."`
* **`notYourVehicleToTrustMsg`**
  * **Description**: Message shown when a player tries to grant or revoke access to a vehicle they do not own.
  * **Default Value**: `'You do not own the inputted vehicle, therefore you cannot trust/untrust another player to drive it.'`
* **`maxSlots`**
  * **Description**: Message displayed when a player attempts to add more users to their vehicle than the allowed limit.
  * **Default Value**: `"You cannot trust anymore players to use your vehicle (Max slot limit reached)."`

**3. Menu Configuration**

The `config.menu` table controls how the vehicle keys menu is accessed and displayed.

* **`menu_title`**
  * **Description**: Sets the title of the vehicle keys menu.
  * **Default Value**: `"Vehicle Keys"`
* **`use_command_to_open`**
  * **Description**: Determines if a command can be used to open the vehicle keys menu.
  * **Default Value**: `true`
  * **Usage**: Set to `true` to enable the command or `false` to disable it.
* **`command_to_open`**
  * **Description**: The command players need to type to open the vehicle keys menu.
  * **Default Value**: `"keys"`
* **`use_keybind_to_open`**
  * **Description**: Determines if a keybind can be used to open the vehicle keys menu.
  * **Default Value**: `false`
  * **Usage**: Set to `true` to enable the keybind or `false` to disable it.
* **`keybind_to_open`**
  * **Description**: The keybind players can use to open the vehicle keys menu if keybinds are enabled.
  * **Default Value**: `'F6'`
  * **Note**: This keybind is only active if `use_keybind_to_open` is set to `true`.
* **`owned_menu_emoji`**
  * **Description**: Emoji displayed next to vehicles the player owns in the menu.
  * **Default Value**: `'🔑'`
* **`shared_menu_emoji`**
  * **Description**: Emoji displayed next to vehicles the player has access to but doesn’t own.
  * **Default Value**: `'🔑'`

***

## vehicle-whitelist/config.json

<figure><img src="/files/OrrkiFtyDg2bNtBCek9n" alt="" width="375"><figcaption></figcaption></figure>

**1. Token Configuration**

* **`token`**
  * **Description**: This is the bot's token, which is required for the bot to connect to Discord.
  * **Value**: Replace `"tokengoeshere"` with your actual bot token.

**2. Database Configuration**

* **`databasecheck`**
  * **Description**: This parameter likely controls how often the bot checks the database. The value `5` might represent a time interval or a number of retries.
  * **Default Value**: `5`
* **`database`**
  * **Description**: Contains the necessary information to connect to the database where your application's data is stored.
  * **`host`**: The hostname of your database server. `"localhost"` indicates that the database is hosted on the same machine as the bot.
  * **`user`**: The username used to connect to the database. Typically `"root"` for local development.
  * **`password`**: The password for the database user. An empty string `""` indicates no password is set.
  * **`database`**: The name of the specific database your application will use. In this case, it's `"fivem"`.

**3. Presence Configuration**

* **`presence`**
  * **Description**: This section configures how the bot appears on Discord, including its status and activity.
  * **`updateTime`**: How frequently (in minutes or seconds) the bot’s presence information is updated. Here, it's set to `3`.
  * **`status`**: The bot’s online status. `"online"` means the bot will appear as online.
  * **`activity`**: The text displayed as the bot’s current activity. `"NAT RP"` indicates that the bot is "Playing NAT RP".
  * **`type`**: The type of activity the bot is showing. `"PLAYING"` indicates the bot is showing a "Playing" status.

**4. Embed Configuration**

* **`embed`**
  * **Description**: Defines the appearance and details of embeds (rich message formats) the bot sends on Discord.
  * **`name`**: The name displayed in the embed, in this case `"NAT RP"`.
  * **`footer`**: The text displayed in the footer of the embed, also `"NAT RP"`.
  * **`color`**: The color of the embed's sidebar. `"BLUE"` sets the color to blue.

**5. Permissions Configuration**

* **`permissions`**
  * **Description**: This section defines which users or roles have permissions for specific bot commands or actions.
  * **`guild`**: The ID of the Discord server (guild) where the bot is active. The value `"800444740729307177"` is the server’s unique ID.
  * **`roles`**: An array of role IDs that have specific permissions. In this case, the role ID `"800444938793123871"` is listed, meaning members with this role have the required permissions.

**6. Logging Configuration**

* **`logging`**
  * **Description**: This section specifies where the bot logs certain actions, such as when users are added, removed, or trusted.
  * **`added`**: The channel ID where logs related to adding users or vehicles will be sent. The ID `"1255329863498338385"` indicates the specific channel.
  * **`removed`**: The channel ID for logs when users or vehicles are removed, using the same ID.
  * **`trusted`**: The channel ID where logs related to trusting users with vehicles are sent, also using the same ID.

#### Final Remarks

Make sure to customize these configurations to suit the unique requirements of your server. The provided settings are designed to be flexible, enabling you to fine-tune the personal vehicle system for an optimal player experience. Adjust the messages, commands, and menu options to align with your server's gameplay style and rules. You can confirm that everything is functioning correctly if your server console displays the following output:

<figure><img src="/files/UBz8RtmYTE8NOsR8ILwL" alt=""><figcaption></figcaption></figure>


# FiveM Discord Whitelist

A powerful, role-based whitelist system that integrates seamlessly with Discord. This script ensures only authorized members can join your server by verifying user roles in real time. It also provides


# Discord Bot Token

Below there will be a guide on creating a discord bot token and inviting it to your discord.

#### 1. Access the Discord Developer Portal

Start by visiting the [Discord Developer Portal](https://discord.dev/developers/applications/). This portal is where you manage all your applications and bots.

* If you already have a bot, simply select it from the list.
* If not, click the “New Application” button to create one.

<figure><img src="/files/EMH413d6gCXLoF7Mv41z" alt=""><figcaption></figcaption></figure>

#### 2. Name Your Bot

Next, you’ll need to name your bot.

<figure><img src="/files/1Hw3ciOuDJXdKtqTYvWb" alt=""><figcaption></figcaption></figure>

#### 3. Configure Bot Settings

After naming your bot, navigate to the **Bot** tab.

* Click on **Add Bot** if your bot isn't already created.
* Once the bot is created, enable all necessary intents by toggling the options in the **Privileged Gateway Intents** section.

<figure><img src="/files/poKuT33mR8g8jxo6Wq4K" alt=""><figcaption></figcaption></figure>

#### 4. Invite the Bot to Your Discord Server

To invite the bot to your Discord server:

1. Go to the **OAuth2** tab.
2. Under **OAuth2 URL Generator**, select the following scopes:
   * `bot`
   * `applications.commands`
3. Scroll down to **OAuth2 URL Generator** and copy the generated URL.
4. Paste this URL into your browser, select your server, and authorize the bot.

<figure><img src="/files/d62Tu5MeAUkWn91TaYCl" alt=""><figcaption></figcaption></figure>

#### 5. Retrieve and Configure Your Bot Token

Finally, you’ll need to obtain your bot's token:

1. Navigate to the **Bot** tab.
2. Click **Reset Token** to generate a new token.
3. Copy the token and paste it into your `config.lua`file where it says `"token"`.

<figure><img src="/files/V5utnaVZN1Jdg6kNGfUK" alt=""><figcaption></figcaption></figure>

&#x20;              &#x20;

<figure><img src="https://i.imgur.com/0TU9kwv.png" alt=""><figcaption></figcaption></figure>

&#x20;                                                 You have successfully completed the bot setup.


# Edit the config

## Configuration

This script uses a `config.lua` file to manage its Discord-based whitelist/blacklist system. Below is a breakdown of each section and how to customize it.

***

## Top-Level Config

| Key                   | Type   | Description                                                                                               | Default                |
| --------------------- | ------ | --------------------------------------------------------------------------------------------------------- | ---------------------- |
| **`config.token`**    | string | The Discord bot token used to authenticate requests to the Discord API. This must be a valid bot token.   | `""` (empty string)    |
| **`config.serverId`** | string | The ID of your Discord server (guild). Used to fetch member roles and perform whitelist/blacklist checks. | `"800444740729307177"` |

***

### Messages

These are the user-facing messages displayed in different scenarios.

| Key                             | Type   | Description                                                                                                                           | Default                                                                                                                                                 |
| ------------------------------- | ------ | ------------------------------------------------------------------------------------------------------------------------------------- | ------------------------------------------------------------------------------------------------------------------------------------------------------- |
| **`config.messages.whitelist`** | string | The message shown to a user who does not have the required roles when whitelist is enabled.                                           | `"Your account does not have the required roles to join this server."`                                                                                  |
| **`config.messages.blacklist`** | string | The message shown to a user who is blocked from joining because they hold a blacklisted role.                                         | `"Your account is blacklisted from this server."`                                                                                                       |
| **`config.messages.noroles`**   | string | The message shown if the script cannot retrieve the user's roles from Discord (e.g., Discord not connected or a temporary API issue). | `"We were unable to fetch your Discord roles. Please ensure your Discord is properly connected and try again. If the issue persists, contact support."` |

***

### Logging

Controls how the script logs connection events and other information to a Discord webhook.

| Key                          | Type    | Description                                                                                               | Default    |
| ---------------------------- | ------- | --------------------------------------------------------------------------------------------------------- | ---------- |
| **`config.logging.enabled`** | boolean | Enables or disables logging. If `true`, all relevant connection events are sent to the specified webhook. | `true`     |
| **`config.logging.webhook`** | string  | The URL of the Discord webhook to which logs are sent.                                                    | `"Change"` |
| **`config.logging.showIps`** | boolean | If `true`, the player's IP address is included in the logs. If `false`, the IP address is hidden.         | `true`     |

***

### Whitelist

If enabled, only users with roles listed in `allowedRoles` can join the server.

| Key                                 | Type    | Description                                                                                                         | Default                           |
| ----------------------------------- | ------- | ------------------------------------------------------------------------------------------------------------------- | --------------------------------- |
| **`config.whitelist.enabled`**      | boolean | Toggles the whitelist feature. If `true`, the script checks whether a player's roles match the allowed list.        | `false`                           |
| **`config.whitelist.allowedRoles`** | table   | A list of Discord role IDs permitted to join. Any user missing these roles will be denied entry if whitelist is on. | `{ "800444938793123871", "222" }` |

***

### Blacklist

If enabled, users with any of the roles listed in `blockedRoles` will be denied entry to the server.

| Key                                 | Type    | Description                                                                                                              | Default                           |
| ----------------------------------- | ------- | ------------------------------------------------------------------------------------------------------------------------ | --------------------------------- |
| **`config.blacklist.enabled`**      | boolean | Toggles the blacklist feature. If `true`, any user with roles in the blocked list is automatically denied.               | `true`                            |
| **`config.blacklist.blockedRoles`** | table   | A list of Discord role IDs that are blocked from joining. If a user holds any of these roles, they will be denied entry. | `{ "800444938793123871", "222" }` |

***

### Example Usage

```lua
config.token = "YOUR_DISCORD_BOT_TOKEN"
config.serverId = "YOUR_DISCORD_SERVER_ID"

config.messages = {
    whitelist = "You do not meet the whitelist requirements.",
    blacklist = "You have been blacklisted from this server.",
    noroles = "Could not fetch roles. Please connect your Discord properly."
}

config.logging = {
    enabled = true,
    webhook = "YOUR_DISCORD_WEBHOOK_URL",
    showIps = true
}

config.whitelist = {
    enabled = false,
    allowedRoles = { "ROLE_ID_1", "ROLE_ID_2" }
}

config.blacklist = {
    enabled = true,
    blockedRoles = { "ROLE_ID_3", "ROLE_ID_4" }
}
```


# FiveM vMenu Modification

Elevate your server management with our enhanced logging modification for vMenu 3.6.5. Here’s what makes it stand out:

**Step-by-Step Installation Guide for vMenu Logs**

1. **Extract the Files:**
   * Download the provided .rar file.
   * Use an extraction tool (like WinRAR or 7-Zip) to unzip the file.
2. **Replace the vMenu Folder:**
   * Locate the existing **vMenu** folder in your server directory.
   * Replace it with the new **vMenu** folder from the extracted files.
3. **Configure the Discord Webhook:**
   * Open the `server.lua` file using your preferred text editor.
   * At the top of the file, find the line:

     ```lua
     local DISCORD_WEBHOOK_URL = "CHANGE ME"
     ```
   * Replace `"CHANGE ME"` with your actual Discord webhook URL.
   * Save the changes.
4. **Restart Your Server:**
   * Restart your server to apply the new changes and start logging.


# FiveM Vehicle & Weapon Management System

Have you ever needed to whitelist and blacklist numerous vehicles and found it tedious to handle each one individually? This script solves that problem with just a few simple clicks.


# Installing Dependency

The vehicle and weapon system relies on a single dependencies: oxmysql. below is our guide on installing oxmysql and setting up a sql server on windows.

## Oxmysql (Windows Version)

***

<details>

<summary>Installing SQL server</summary>

## *Installing XAMPP:*

#### Step 1: Download and Install XAMPP

1. **Visit the Official XAMPP Website**: Go to [Apache Friends](https://www.apachefriends.org/download.html) and download the XAMPP installer for Windows.&#x20;
2. **Run the Installer**: Launch the downloaded installer. You might need to approve the UAC prompt and disable any antivirus temporarily if it blocks the installation.
3. **Select Components**: During installation, ensure that **Apache**, **MySQL**, and **PHP** are selected. You can deselect other components unless you know you'll need them.
4. **Choose Installation Directory**: You can install XAMPP in the default directory (`C:\xampp`) or choose another location. Click Next and proceed with the installation.
5. **Complete Installation**: Follow the remaining prompts and finish the installation.

**Step 2: Start Apache and MySQL**

1. **Launch XAMPP Control Panel in Administrator**: After installation, open the XAMPP Control Panel. You can find it in the Start Menu or where you installed XAMPP.
2. **Installing services:** When XAMPP opens up click the ❌ button on the left side of Apache and MySQL and install the services.

<img src="https://i.imgur.com/3WElWOb.png" alt="" data-size="original">

3. **Start Apache and MySQL**: Click the 'Start' buttons next to Apache and MySQL. This will run your local server and database server.

**Step 3: Creating The Database**

1. **Open phpMyAdmin: Open phpMyAdmin using the `Admin` Button on Apache.**

<img src="/files/nGLfvW0o0nF7AJII7bPj" alt="" data-size="original">

2. **Creating a database:** Upon opening phpMyAdmin click new on the top left then type for database name `fivem` (all lowercase) then click create.

<img src="/files/EP0P4plN9EURx1ysxcO5" alt="" data-size="original">

Congratulations, you now know how to create a fivem database. Move on to the next page to continue the installation.

</details>

<details>

<summary>Creating an SQL string</summary>

Creating your connection string:

1. **Visit the MySQL String Generator Website:** [Here](https://brouznouf.github.io/fivem-mysql-async/)
2. Click `Next` twice until you are on `3: Configure the FXServer`.

<img src="/files/ydVZf1eoFG7Hfdl6AUNQ" alt="" data-size="original">

3. **After you are on the 3rd page, scroll down until you see this:**

<img src="/files/BSh4JmiTfRUsVtQDSyGR" alt="" data-size="original">

4. **The following information will be required for your connection string to work:** (Some other things you can add will be: **acquireTimeout** and **connectTimeout** - These will make the string take longer before connecting / pushing an error.)

* User
* database
* host
* password

<img src="https://i.imgur.com/I2hE9QE.png" alt="Password only required if you created with a password" data-size="original">

5. **After filling out the info regarding your database and you should see a section called `FXServer Configuration`**
6. **Copy the line shown below from the website and paste it into your server.cfg and restart your server**

<img src="/files/QPoCJdvJ8lsmtOfVKV0C" alt="" data-size="original">

## Ensuring oxmysql or mysql-async

Whether you use [oxmysql ](https://github.com/overextended/oxmysql)or [mysql-async](https://github.com/brouznouf/fivem-mysql-async) the way you ensure the it matters.

1. Put the following lines of code into your server.cfg below all the default resources required by FiveM.
2. **When downloading the files from github always select the releases version on the right side.**

<img src="/files/0yNXJNIG3wtFu9clxLB6" alt="" data-size="original">

```lua
set mysql_connection_string "host=localhost;user=root;database=fivem"
ensure oxmysql -- Only if using oxmysql
```

Congratulations, you connected your database to your FiveM Server!

</details>


# Configuration Guide

This document explains how to edit your config.lua file to set up your Discord bot token and server-specific settings properly.

***

### 📁 File: `config.lua`

#### Sample Config:

```lua
config = {}

config.token = ""  -- Your Discord bot token goes here
config.serverId = "800444740729307177"

config.commandName = "vehicleconfig"  -- Command to open or trigger vehicle config features
config.adminRefreshRoles = "refresh-roles"  -- Admin-only command to refresh someone's roles

config.allowAdminBypass = true  -- If true, users with admin roles can bypass restrictions

config.adminRoles = {
    "800444938793123871"  -- Role IDs that are allowed to use admin commands
}
```

***

### 🧾 How to Edit

#### 1. 🔐 **Insert Your Bot Token**

Get your token from the [Discord Developer Portal](https://discord.com/developers/applications):

* Go to your bot application
* Navigate to **Bot > Token > Click "Copy"**
* Paste it into `config.token`:

```lua
config.token = "YOUR_BOT_TOKEN_HERE"
```

⚠️ **Do NOT share this token with anyone!**

***

#### 2. 🆔 **Set the Server ID**

Replace the existing `config.serverId` with the **ID of the Discord server** your bot will operate in:

```lua
config.serverId = "YOUR_SERVER_ID"
```

You can right-click your server in Discord (developer mode enabled) to copy the ID.

***

#### 3. 🔁 **Change Command Names (Optional)**

You can customize the slash commands used in Discord:

```lua
config.commandName = "vehicleconfig"  -- Main command
config.adminRefreshRoles = "refresh-roles"  -- Admin-only subcommand
```

***

#### 4. 👮‍♂️ **Enable or Disable Admin Bypass**

This allows users with the defined admin roles to bypass restrictions (like checks or cooldowns):

```lua
config.allowAdminBypass = true  -- or false
```

***

#### 5. 🎖️ **Configure Admin Roles**

Replace the role IDs with your server's admin role(s). You can add multiple role IDs:

```lua
config.adminRoles = {
    "ROLE_ID_1",
    "ROLE_ID_2"
}
```

To get a role ID in Discord:

* Enable Developer Mode (User Settings > Advanced > Developer Mode)
* Right-click a role > **Copy ID**

***

### ✅ Example Final Config

```lua
config.token = "MzYzNzEyMzEyMzEyMzEyMzEyMzEy"  -- Your bot token
config.serverId = "123456789012345678"

config.commandName = "vehconfig"
config.adminRefreshRoles = "reloadroles"
config.allowAdminBypass = true

config.adminRoles = {
    "987654321098765432",  -- Admin role 1
    "876543210987654321"   -- Admin role 2
}
```

***


# FiveM Admin Zone

A very basic script that administrators can use for staff tasks like setting up admin areas. As a result, other players are aware of the staff issue.

***

### 📁 File: `config.lua`

#### Full Example:

```lua
config = {}

config.message = "~r~You are near an staff situation, please stay away."
config.text = {
    x = 0.45,
    y = 0.0
}

config.defaultRadius = 100  -- Default radius for the zone (in game units/metres)
config.maxRadius = 100      -- Maximum allowed radius

config.perms = {
    useFramework = true,
    frameworkName = "framework",      -- Your framework resource name (e.g., "esx", "qb-core")
    departmentLevel = "admin_level",  -- The permission key/level inside your framework

    acePerms = "zone.clear"           -- Fallback ACE permission if framework is disabled
}
```

***

### 🔔 What It Does

* Displays a **warning message** on screen when a player is near an active staff situation or zone.
* Uses either **framework-based permissions** or **ACE permissions** to allow staff to manage these zones.
* Supports radius configuration to define how close a player can get before receiving the alert.

***

### 🧾 Configuration Breakdown

#### 🧨 `config.message`

This is the message displayed to players who enter the restricted zone.

```lua
config.message = "~r~You are near an staff situation, please stay away."
```

> You can use in-game color codes (e.g., `~r~` for red, `~b~` for blue).

***

#### 🧭 `config.text`

Sets the screen coordinates for the warning message:

```lua
config.text = {
    x = 0.45,
    y = 0.0
}
```

* `x`: Horizontal position (0.0 left to 1.0 right)
* `y`: Vertical position (0.0 top to 1.0 bottom)

***

#### 📏 `config.defaultRadius` & `config.maxRadius`

Defines the distance (in meters) around the staff zone where the warning becomes active.

```lua
config.defaultRadius = 100
config.maxRadius = 100
```

> The system may allow setting custom radii on a per-zone basis, up to `maxRadius`.

***

### 🔐 Permissions Setup

You can control who can create or manage these zones using either a framework or ACE permissions.

#### ✅ Framework Mode

```lua
config.perms.useFramework = true
config.perms.frameworkName = "framework"
config.perms.departmentLevel = "admin_level"
```

* **useFramework**: Enables permission checking through your framework.
* **frameworkName**: Name of the framework resource (e.g., `"framework"`).
* **departmentLevel**: Key used to identify admins (e.g., check if `PlayerData.dept == "admin"` or similar department in your framework).

***

#### 🔒 ACE Permissions Mode

If your server doesn’t use a framework or you prefer ACE-based permissions:

```lua
config.perms.useFramework = false
config.perms.acePerms = "zone.clear"
```

To grant access:

In your `server.cfg`, add:

```
add_ace group.admin "zone.clear" allow
```

***

### ✅ Summary

| Setting         | Purpose                                                |
| --------------- | ------------------------------------------------------ |
| `message`       | The warning shown to players                           |
| `text`          | Where the message appears on screen                    |
| `defaultRadius` | Default warning zone size                              |
| `maxRadius`     | Max limit for warning zones                            |
| `perms`         | Handles who can create/manage zones (framework or ACE) |

***


# FiveM EUP V2

Managing EUP has never been this easy. Forget about SQL, messy configs, or constant edits. With Discord role integration and a simple, clean menu system, you can create unlimited departments.

### Installation

You can also edit the config trough our config generator: [https://config.nat2k15.xyz ](https://config.nat2k15.xyz/)

#### 1. Prerequisites

* **Discord Bot Integration** (for role permissions)
* **NativeUI** (included in the script)

#### 2. File Structure

```
FiveM Eup V2/
├── client/
│   ├── NativeUI.lua          # NativeUI library
│   ├── client.lua            # Main client-side logic
│   └── editmenu.lua          # Admin edit menu
├── server/
│   ├── discord.lua           # Discord integration
│   └── server.lua            # Server-side logic
├── config.lua                # Client configuration
├── svConfig.lua              # Server configuration (Discord)
└── fxmanifest.lua            # Resource manifest
```

#### 3. Installation Steps

1. **Download and Extract**
   * Place the FiveM EUP V2folder in your server's `resources/` directory
2. **Configure Discord Integration**

   * Edit `svConfig.lua`:

   ```lua
   configS.bot_token = "YOUR_DISCORD_BOT_TOKEN"
   configS.server_id = "YOUR_DISCORD_SERVER_ID"
   ```
3. **Set Admin Roles**

   * Edit `config.lua` and add Discord role IDs to `adminRoles`:

   ```lua
   adminRoles = {
       "800444938793123871",  -- Replace with your admin role ID
       "123456789012345678",  -- Add more role IDs as needed
   }
   ```
4. **Add to server.cfg**

   ```
   ensure eup-menu
   ```
5. **Restart Server**

### Configuration

#### Client Configuration (`config.lua`)

```lua
config = {
    debug = false,                    -- Enable debug logging
    defaultMenuPosition = "right",    -- Menu position: "right", "left"
    width = 80,                      -- Menu width
    menuName = "EUP Menu",           -- Main menu title
    menuSubtitle = "Your Subtitle",  -- Menu subtitle
    banner = {
        enabled = false,             -- Enable custom banner
        url = "https://example.com/banner.png"  -- Banner image URL
    },
    adminRoles = {
        "800444938793123871",        -- Discord role IDs with admin access
    }
}
```

#### Server Configuration (`svConfig.lua`)

```lua
configS = {
    bot_token = "YOUR_BOT_TOKEN",    -- Discord bot token
    server_id = "YOUR_SERVER_ID"     -- Discord server ID
}
```

### Usage

#### For Players

* **Command**: `/eup`
* Navigate through departments using the menu
* Click on outfit names to apply them
* Use arrow indicators (→) to enter sub-menus
* Use "← Go Back" to return to parent menus

#### For Administrators

* Use the `/eupedit` command
* Admins will see additional options in the edit menu
* Can create, edit, and delete departments and outfits
* Can assign role requirements to specific items

### Permission System

#### Role-Based Access

* Assign Discord role IDs to departments or individual outfits
* Players must have the required role to see/use the item
* Admins (configured in `adminRoles`) can access everything

#### Setting Permissions

```lua
-- Department with role requirement
{
    name = "Police Department",
    requiredRole = "123456789012345678",
    children = { ... }
}

-- Individual outfit with role requirement
{
    label = "SWAT Gear",
    requiredRole = "987654321098765432",
    clothing = { ... }
}
```

### Troubleshooting

#### Common Issues

1. **Menu Not Opening**
   * Check console for errors
   * Verify Discord integration is working
   * Enable debug mode: `config.debug = true`
2. **Outfits Not Applying**
   * Check clothing data structure
   * Verify drawable/texture values are valid
   * Enable debug logging to see application process
3. **Permission Issues**
   * Verify Discord role IDs are correct
   * Check bot token and server ID
   * Ensure bot has proper permissions
4. **Admin Menu Not Accessible**
   * Verify your Discord role ID is in `config.adminRoles`
   * Check Discord integration is functioning
   * Restart the resource after config changes

#### Debug Mode

Enable debug logging by setting `config.debug = true` in `config.lua`. This will provide detailed console output for:

* Clothing application process
* Permission checks
* Menu operations
* Server-side tree operations

#### Console Commands

* `/eup` - Open the EUP menu

### Advanced Features

#### Custom Banners

Enable custom menu banners by configuring:

```lua
banner = {
    enabled = true,
    url = "https://your-image-url.com/banner.png"
}
```

#### Menu Positioning

Configure default menu position:

* `"left"` - Left side of screen
* `"right"` - Right side of screen
* `nil` or other - Center position

### Data Storage

* Outfit configurations are stored in FiveM's Key-Value Pair (KVP) system
* Data persists across server restarts
* Admins can modify configurations in real-time

### Support

For issues or questions:

1. Check the console for error messages
2. Enable debug mode for detailed logging
3. Verify all configuration values are correct
4. Ensure Discord integration is properly set up

<https://discord.gg/RquDVTfDwu>


# Ticket Bot V2

One of the most advanced ticket bot in the market. It features a close system. It supports multi-guild. Has a very advanced transcript HTML system.


# 💻Windows Hosting Guide

Creating a local server environment on your Windows machine with XAMPP and setting up a database for discord bot hosting involves a few steps. This guide will show you how to do it in no time!


# 🛢️MySQL Installation (xampp)

Creating a local server environment on your Windows machine with XAMPP and setting up a database for discord bot hosting involves a few steps. This guide will show you how to do it in no time!

### *Installing XAMPP:* <a href="#installing-xampp" id="installing-xampp"></a>

**Step 1: Download and Install XAMPP**

1. **Visit the Official XAMPP Website**: Go to [Apache Friends](https://www.apachefriends.org/download.html) and download the XAMPP installer for Windows.
2. **Run the Installer**: Launch the downloaded installer. You might need to approve the UAC prompt and disable any antivirus temporarily if it blocks the installation.
3. **Select Components**: During installation, ensure that **Apache**, **MySQL**, and **PHP** are selected. You can deselect other components unless you know you'll need them.
4. **Choose Installation Directory**: You can install XAMPP in the default directory (`C:\xampp`) or choose another location. Click Next and proceed with the installation.
5. **Complete Installation**: Follow the remaining prompts and finish the installation.

**Step 2: Start Apache and MySQL**

1. **Launch XAMPP Control Panel in Administrator**: After installation, open the XAMPP Control Panel. You can find it in the Start Menu or where you installed XAMPP.
2. **Installing services:** When XAMPP opens up click the ❌ button on the left side of Apache and MySQL and install the services.

<figure><img src="https://docs.nat2k15.xyz/~gitbook/image?url=https%3A%2F%2Fi.imgur.com%2F3WElWOb.png&#x26;width=768&#x26;dpr=4&#x26;quality=100&#x26;sign=b560f1d1&#x26;sv=2" alt=""><figcaption></figcaption></figure>

1. **Start Apache and MySQL**: Click the 'Start' buttons next to Apache and MySQL. This will run your local server and database server.

**Step 3: Creating The Database**

1. **Open phpMyAdmin: Open phpMyAdmin using the `Admin` Button on Apache.**
2. **Creating a database:** Upon opening phpMyAdmin click new on the top left then type for database name `ticketbot` (all lowercase) then click create.

Congratulations, you now know how to create a bot database. Move on to the next page to continue the installation.

<figure><img src="/files/WJEKREHOpueOpawVQMEs" alt=""><figcaption></figcaption></figure>


# 👨‍💻Installing Node.js

This is a very crucial part without installing node.js the bot simply wont run.

**Guide to Installing Node.js on a Windows VPS for Bot Hosting**

***

#### Step 1: Download Node.js Installer

1. **Open a Web Browser**
   * Launch a browser on your VPS, such as Microsoft Edge.
2. **Visit the Node.js Website**
   * Navigate to <https://nodejs.org/>.
3. **Choose the Installer**
   * Select the **LTS (Long-Term Support)** version for stability.
   * Click on the Windows Installer (**.msi** file) to download it.

***

#### Step 2: Install Node.js

1. **Run the Installer**
   * Double-click the downloaded `.msi` file to start the installation process.
2. **Follow the Installation Wizard**
   * Click **Next** to proceed.
   * Accept the license agreement and click **Next**.
   * Choose the default installation path or specify a custom one.
3. **Select Components**
   * Ensure that the `npm package manager` option is selected.
   * Click **Next**.
4. **Complete the Installation**
   * Click **Install** and wait for the process to finish.
   * Click **Finish** once done.

***

#### Step 3: Verify Installation

1. **Open Command Prompt**
   * Press `Win + R`, type `cmd`, and hit Enter.
2. **Check Node.js Version**
   * Run the following command:

     ```
     node -v
     ```
   * This will display the installed version of Node.js.
3. **Check npm Version**
   * Run the following command:

     ```
     npm -v
     ```
   * This will display the installed version of npm (Node Package Manager).

***

#### Conclusion

You have successfully installed Node.js on your Windows VPS and set up the environment for hosting your bot. With Node.js and npm ready, you can now develop and deploy your bot seamlessly. For further customization and troubleshooting, refer to the Node.js documentation.


# Multi Server Control


# 💻Windows Hosting Guide


# 👨‍💻Installing Node.js

This is a very crucial part without installing node.js the bot simply wont run.

**Guide to Installing Node.js on a Windows VPS for Bot Hosting**

***

#### Step 1: Download Node.js Installer

1. **Open a Web Browser**
   * Launch a browser on your VPS, such as Microsoft Edge.
2. **Visit the Node.js Website**
   * Navigate to <https://nodejs.org/>.
3. **Choose the Installer**
   * Select the **LTS (Long-Term Support)** version for stability.
   * Click on the Windows Installer (**.msi** file) to download it.

***

#### Step 2: Install Node.js

1. **Run the Installer**
   * Double-click the downloaded `.msi` file to start the installation process.
2. **Follow the Installation Wizard**
   * Click **Next** to proceed.
   * Accept the license agreement and click **Next**.
   * Choose the default installation path or specify a custom one.
3. **Select Components**
   * Ensure that the `npm package manager` option is selected.
   * Click **Next**.
4. **Complete the Installation**
   * Click **Install** and wait for the process to finish.
   * Click **Finish** once done.

***

#### Step 3: Verify Installation

1. **Open Command Prompt**
   * Press `Win + R`, type `cmd`, and hit Enter.
2. **Check Node.js Version**
   * Run the following command:

     ```
     node -v
     ```
   * This will display the installed version of Node.js.
3. **Check npm Version**
   * Run the following command:

     ```
     npm -v
     ```
   * This will display the installed version of npm (Node Package Manager).

***

#### Conclusion

You have successfully installed Node.js on your Windows VPS and set up the environment for hosting your bot. With Node.js and npm ready, you can now develop and deploy your bot seamlessly. For further customization and troubleshooting, refer to the Node.js documentation.


# Starting The Bot

Placeholder for now use a ticket for support


